Google Android TV Reference RCU Platform
Contents
Introduction
Google Android TV Reference RCU Platform is based on Bluetooth LE remote control (RC) which is built on Telink TLSR827x platform, and has button function and voice command function support. The reference RCU platform is based on TLSR8271F512ET48 in conjunction with Google.
Resources
| Part Number | Datasheet | SDK | Dev Kit | Hardware Design Guide | TLSR8278 Audio RCU Reference Design |
|---|---|---|---|---|---|
| TLSR8271F512ET48 | TLSR8271 Datasheet | Google Git | TLSR8278 Audio RCU Starter Kit | TLSR827X Hardware Design Guide | FR1 Reference Design FR4 Reference Design |
Demo
The demo below uses the TLSR8278 Audio RCU Starter Kit to demonstrate button function and voice test of the Google Android TV Reference RCU Platform.
Material List
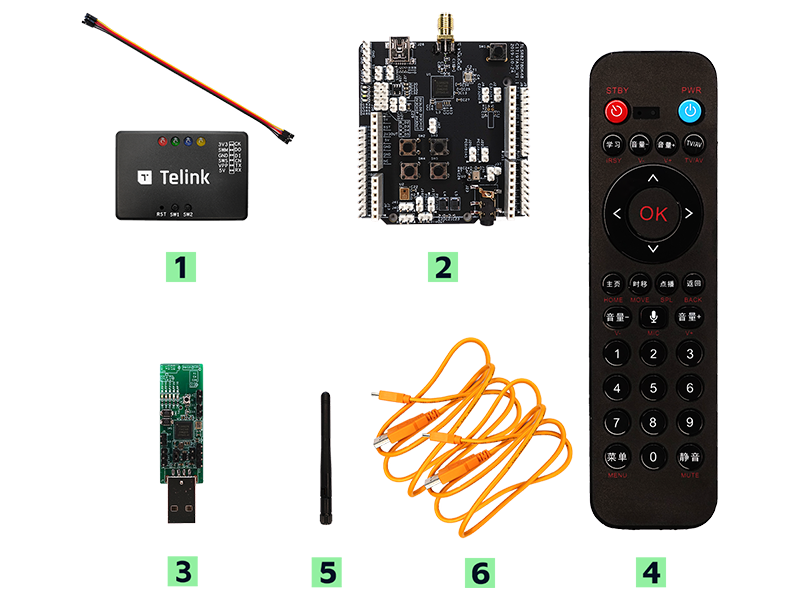
| Item | S/N | Product Name | Qty |
|---|---|---|---|
| 1 | TLSRGSOCBK56B | Telink Burning Board (SWS BURING EVK, including DuPont wires) | 1 |
| 2 | TLSR8278DK48D | TLSR8278 Development Board | 1 |
| 3 | TLSR8278DG48D | TLSR8278 Dongle | 1 |
| 4 | TLSR8278ARC48D | TLSR8278 Audio RCU | 1 |
| 5 | Whip antenna | 2.4Ghz antenna | 1 |
| 6 | USB cable | USB A to mini USB | 2 |
PC installed with
- TELINK BDT tool
- Audacity software
- Notepad application
AAA Batteries
Features
The RC demo supports the following features:
- works with dual batteries
- 27 valid buttons and 2-color indicating LEDs
- Google voice service
- Voice compressed with ADPCM, supported sample rate 16Khz/16bit
- Repeated buttons
- Couch mode
- OTA firmware upgrade
- PC tool for button display and demonstration
For detailed descriptions, please refer to the product specification document “Spec For TLSR827x-based BLE Audio Remote Control”.
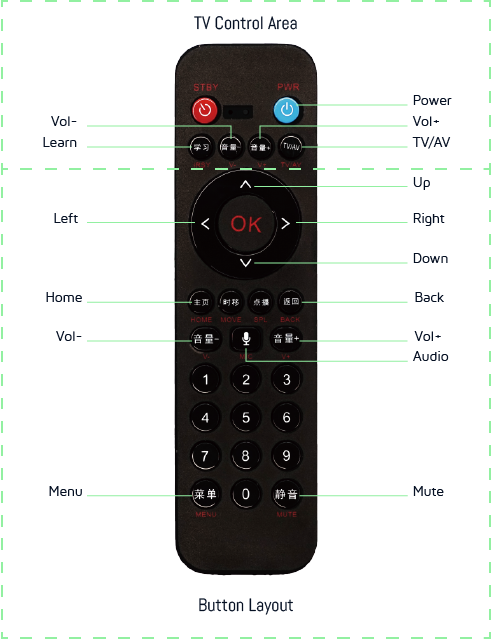
Button Layout
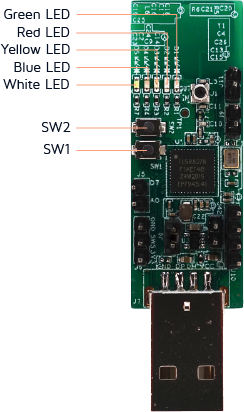
The appearance of the TLSR8278 Audio RCU and TLSR8278 Dongle are as follows:
Quick Start
Configuring the Starter Kit
- Connect the Burning Board to the USB port of the PC. Connect the Audio Remote Control to the Burning Board.
- Launch the TELINK BDT tool on PC, and program the Audio Remote Control and Dongle (receiver).
- Disconnect the target boards from the Burning Board. Disconnect the Burning Board from the PC.
Pairing the Audio Remote Control
- Insert batteries to power on the Audio Remote Control.
- Plug the Dongle into the PC USB port.
- Enter pairing mode by long pressing the “OK” button and the “Right” button at the same time for 5 seconds.
- The flashing red LED on the Remote Control indicates that the pairing mode is on.
- Press the “SW2” button on the Dongle to receive advertise packets.
- The red LED on the Dongle will turn on, indicating that it has paired with the Audio Remote Control.
Testing the Audio Remote Control
Button Press Test
- Open the “Notepad” app on your PC.
- “Press the buttons (numbers/enter/up/down/left/right) and observe the results in the “Notepad”.
Voice Test
- With the Dongle still plugged into the PC, launch the Audacity software with a new recording iframe.
- Click the “Record” button to start recording.
- Then press and hold the MIC button on the Audio Remote Control and start talking.
- You will see that Audacity starts to record your voice data that is received by the Dongle.
- Release the MIC button when you have finished talking. Click the “Stop” button to stop recording.
- Verify the recorded voice by replaying it in Audacity.
Un-pairing the Audio Remote Control
- To unpair the Audio Remote Control, simply long press the “down” button and the “OK” button at the same time for 5 seconds.
- When the red LED on the Audio Remote Control blinks and the LED on the Dongle changes from red to white, the Remote Control has been successfully unpaired.